Это старая версия документа!
 Diese Seite wurde noch nicht vollständig übersetzt. Bitte helfen Sie bei der Übersetzung.
(diesen Absatz entfernen, wenn die Übersetzung abgeschlossen wurde)
Managing DMX 512 light on RASPBERRY PI
So when you need to budget and adjust the light, managing remotely from a tablet or laptop. All that I write below is a purely budgetary solution, which will have to be a little tricky <del> brainwashing </ del>. But the end result is worth it.
What you need
- Raspberry PI B ++, RASPBERRY PI 2 or RASPBERRY PI 3 (It is possible to obtain and Orange PI <del> orange </ del>) - WI-FI Whistle - Udmx or ARTnet interface - Patience - Flash memory card Flash drive for malinki must be at least 6 class, and its minimum size is not lower than 4 GB of memory. Better Flash 10 class. / I tried 6 classes on 8 GB, I did not start, malinka is very capricious to flash drives / /
Customizing Raspberry
We will configure and download everything on Windows 7 ( or on any other Windows, I configured it on 64bit )
Download
- OS RASPBIAN JESSIE QLC+(Ready image with QLC+ RASPBIAN )
Установка RASPBIAN
Unzip RASPBIAN JESSIE WITH PIXEL (we should get a file with the extension .img) Install and open the program Win32diskimager, and first we will select a USB flash drive where we will write the system, after we select our unzipped file, and click the Write button ( write ) <WRAP center round tip 60%> In order to enable SSH access, we need to create a ssh or ssh.txt file in the root of the flash drive </WRAP>
 After completing the recording on the flash card,
  Go to it and create a file wpa_supplicant.conf ( This file is responsible for configuring the network )
In it we will see the following:
Go to it and create a file wpa_supplicant.conf ( This file is responsible for configuring the network )
In it we will see the following:
network={
ssid="YOUR_NETWORK_NAME"
psk="YOUR_NETWORK_PASSWORD"
proto=RSN
key_mgmt=WPA-PSK
pairwise=CCMP
auth_alg=OPEN
}
Ssid = «YOUR_NETWORK_NAME» is the name of our WI-FI network ( YOUR_NETWORK_NAME change to your )
Psk = «YOUR_NETWORK_PASSWORD» - the password of our network ( YOUR_NETWORK_PASSWORD should change to your password )
Proto = RSN - to protect your network, it can be WPA1 or WPA2 (for WPA2, it uses RSN , and for WPA1 it's just WPA in most cases this parameter track not necessary).
key_mgmt=WPA-PSK - The parameter is responsible for encrypting the password, WPA-PSK (in most cases) or WPA-EAP (in corporate networks) ( parameter too tracking does not follow )
Pairwise = CCMP - for WPA2 leave CCMP , for WPA1 change to TKIP
Auth_alg = OPEN - leave it as it is.
<WRAP center round tip 60%>
After setting up and connecting RASPBERRY PI at boot, the WI-FI whistle should light up. Check the connection of raspberries, you can in the settings of the router.
</WRAP>
Connect with SSH
When we learned the IP address of our malinka, run PUTTY and connect to SSH
 And after a successful connection, the malink will ask for the login and password
 Default:
Login:pi
Password:dmx-512.ru
RDP Connection
To run the RDP client under Windows, run on your computer:
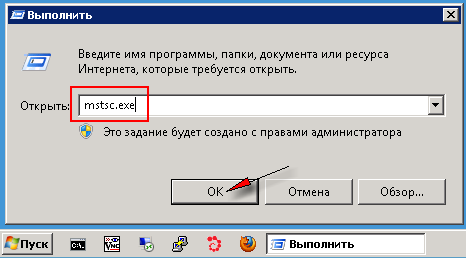
1. Press the menu « Start » (« Start ») → select the item « Run …»(«Run…») (или нажмите сочетание клавиш WIN+R):
 2. In the window that appears, type mstsc.exe and click « OK »:
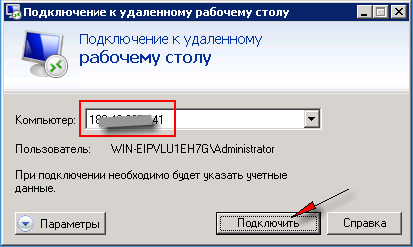
 3. Enter IP address RASPBERRY in the field « Computer » and press the button « Connect »:
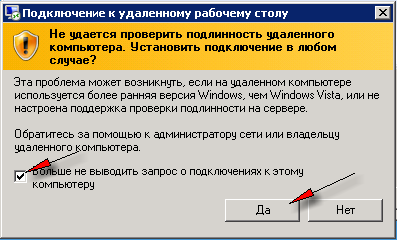
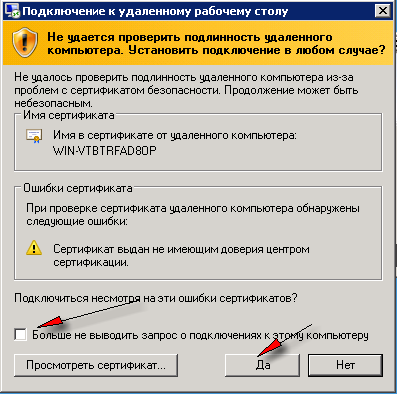
 4. If the « can not be authenticated » window appears, check the box « no longer display the query » and press the « Yes » button: