Это старая версия документа!
Managing DMX 512 light on RASPBERRY PI
So when you need to budget and adjust the light, managing remotely from a tablet or laptop. All that I write below is a purely budgetary solution, which will have to be a little tricky <del> brainwashing </ del>. But the end result is worth it.
What you need
- Raspberry PI B ++, RASPBERRY PI 2 or RASPBERRY PI 3 (It is possible to obtain and Orange PI <del> orange </ del>) - WI-FI Whistle - Udmx or ARTnet interface - Patience - Flash memory card Flash drive for malinki must be at least 6 class, and its minimum size is not lower than 4 GB of memory. Better Flash 10 class. / I tried 6 classes on 8 GB, I did not start, malinka is very capricious to flash drives / /
Customizing Raspberry
We will configure and download everything on Windows 7 ( or on any other Windows, I configured it on 64bit )
Download
- OS RASPBIAN JESSIE QLC+(Ready image with QLC+ RASPBIAN )
Установка RASPBIAN
Unzip RASPBIAN JESSIE WITH PIXEL (we should get a file with the extension .img) Install and open the program Win32diskimager, and first we will select a USB flash drive where we will write the system, after we select our unzipped file, and click the Write button ( write ) <WRAP center round tip 60%> In order to enable SSH access, we need to create a ssh or ssh.txt file in the root of the flash drive </WRAP>
 After completing the recording on the flash card,
  Go to it and create a file wpa_supplicant.conf ( This file is responsible for configuring the network )
In it we will see the following:
Go to it and create a file wpa_supplicant.conf ( This file is responsible for configuring the network )
In it we will see the following:
network={
ssid="YOUR_NETWORK_NAME"
psk="YOUR_NETWORK_PASSWORD"
proto=RSN
key_mgmt=WPA-PSK
pairwise=CCMP
auth_alg=OPEN
}
Ssid = «YOUR_NETWORK_NAME» is the name of our WI-FI network ( YOUR_NETWORK_NAME change to your )
Psk = «YOUR_NETWORK_PASSWORD» - the password of our network ( YOUR_NETWORK_PASSWORD should change to your password )
Proto = RSN - to protect your network, it can be WPA1 or WPA2 (for WPA2, it uses RSN , and for WPA1 it's just WPA in most cases this parameter track not necessary).
key_mgmt=WPA-PSK - The parameter is responsible for encrypting the password, WPA-PSK (in most cases) or WPA-EAP (in corporate networks) ( parameter too tracking does not follow )
Pairwise = CCMP - for WPA2 leave CCMP , for WPA1 change to TKIP
Auth_alg = OPEN - leave it as it is.
<WRAP center round tip 60%>
After setting up and connecting RASPBERRY PI at boot, the WI-FI whistle should light up. Check the connection of raspberries, you can in the settings of the router.
</WRAP>
Connect with SSH
When we learned the IP address of our malinka, run PUTTY and connect to SSH
 And after a successful connection, the malink will ask for the login and password
 Default:
Login:pi
Password:dmx-512.ru
RDP Connection
To run the RDP client under Windows, run on your computer:
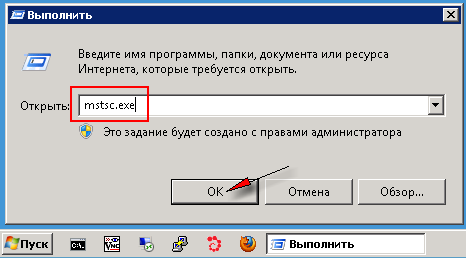
1. Press the menu « Start » (« Start ») → select the item « Run …»(«Run…») (или нажмите сочетание клавиш WIN+R):
 2. In the window that appears, type mstsc.exe and click « OK »:
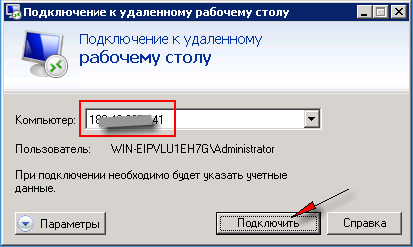
 3. Enter IP address RASPBERRY in the field « Computer » and press the button « Connect »:
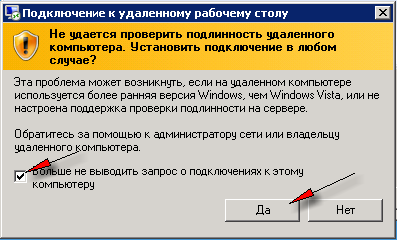
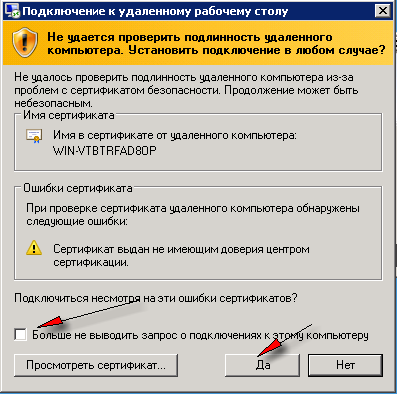
 4. If the « can not be authenticated » window appears, check the box « no longer display the query » and press the « Yes » button: